
Tips on Planting and Growing Ferns
All the ferns for sale have similar requirements, with a few exceptions, as noted below.
Placement
Ferns love light, but not too much. Dappled shade is perfect. A northern exposure is also welcomed. Morning sun is preferable to afternoon sun, especially during the hottest days of summer.
If your fern is receiving too much direct sun, the fronds may turn brown (some appear bleached or yellowed), curl, and wither. In this case, move the fern to a shadier location, especially one that is not exposed to full sun especially during 12:00-4:00 p.m. Cut the browned fronds back to the ground, water well, and the fern should regrown once it has adjusted to the shadier location.
The two Maidenhair Ferns tolerate lower light conditions than the other ferns, and generally prefer a northern exposure, with ample moisture.
Preparing the Soil
Ferns thrive in organic, loamy soil that drains well.
Many times, the hardest part about planting is preparing the soil, but it’s worth it! Take the extra time to dig three times the width of the pot and just as deep. (Note that if your soil needs amending, dig deeper and wider when adding compost or amendment.)
We strongly recommend that you add compost to your soil with every fern that is planted! This will give the fern(s) the best chance for growing healthy and strong.
None of these ferns like “wet feet” or to sit in water. If your soil contains a lot of clay and doesn’t break up easily in your hands, add compost or purchase “in ground” soil amendment in a 50/50 ratio.
A good test is how easily you can push a Hori Hori knife blade or a garden trowel into the soil. If you get it to the knife hub or handle without pushing hard, then you are ready to plant.
Planting with Biodegradable Pots
Your fern comes in a biodegradable pot! This is good for the earth, reduces plastic, waste, and minimizes stress and damage to the fern’s root system.
The only disadvantage is that they can be delicate when wet. If you are concerned about it breaking apart before you have a chance to plant it, simply plop the pot into another container (such as a recycled plastic pot, a ceramic pot, a large saucer, etc.) until you are ready to plant your fern.
When you are ready to plant your fern, place the entire pot into your planting hole!
Moisture will easily break down the pot and your fern’s root system will work its way through the sides and bottom.
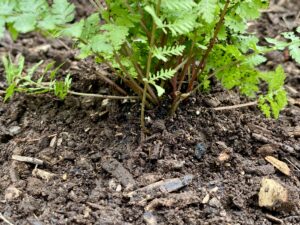
When planting, avoid covering the crown of the fern with soil. See the photo below as a good guide. Never sink the fern crown lower than your soil level.
Biodegradable Pot Tips:
#1 – To avoid the top of the pot showing (as shown in the photo below), lightly break or tear off the top part of the pot, so it doesn’t stick above the soil. If you’d rather leave the top of the pot, look at the level of where the fern grows out of the soil, then place the pot in the hole and line up the soil inside the pot with the soil in your garden bed. Ignore the raised edges of the biodegradable pot.
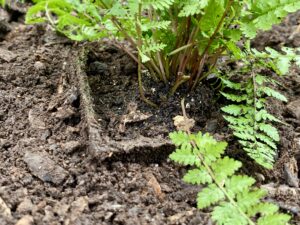
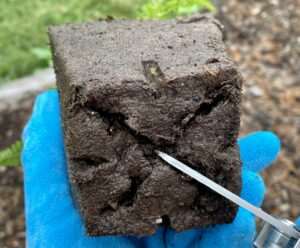
#2 – If you’d like, you may cut an X in the bottom of the pot to ensure easy access to soil by the fern’s roots, but if you can easily break the bottom of the pot, this step is not necessary.
Watering
Regular watering is essential for new ferns. The ground should be kept moist during the first year.
It’s best to slowly water your ferns (and other plants) so they receive a good “drink” to encourage root growth. In the hotter months, ferns appreciate a light spray over their fronds.
Do not worry if your ferns dry out for a short spell. They want to survive, and if you give them a deep watering, they should recover.
Mulching
It is fine to mulch your ferns, but do not cover their crowns.
We recommend a natural mulch without dyes or chemicals, such as pine fines, decomposing leaves, or smaller wood chips. These types of mulches will break down and add nutrients to your garden.